小編有好多年沒遇到Juniper的防火牆了,就隨手紀錄一下,分享給有需要的網友們。
本篇要介紹的是Juniper SRX 防火牆設定檔備份及還原。
[備份設定檔]
步驟01、在「CLI operational mode」模式下進行備份設定檔
指令語法:
root@testfw> request system configuration rescue save
※注意提示符號是否為「>」

步驟02、檢查備份是否成功
指令語法:
root@testfw> test configuration /config/rescue.conf.gz

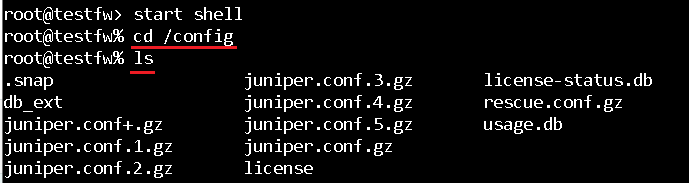
步驟03、查看備份檔案
(1)、在「CLI operational mode」模式下切換系統shell
指令語法:
root@testfw> start shell

(2)、查看檔案
指令語法:
root@testfw% cd /config
root@testfw% ls
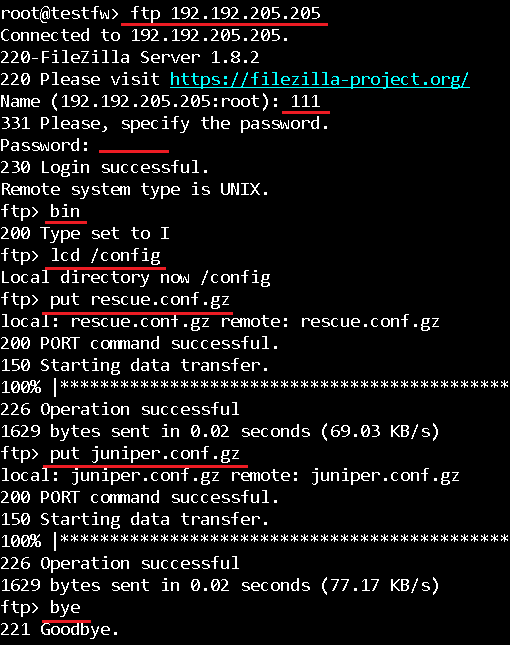
步驟04、將備份檔案傳送到FTP站台
(1)、連線到FTP站台,本範例的FTP Server IP為192.192.205.205
指令語法:
ftp 192.192.205.205
※成功連線後會需要輸入帳號及密碼
(2)、切換傳輸模式為2進位模式
指令語法:
bin
(3)、將本地目錄切換到設定檔備份目錄「/config」
指令語法:
lcd /config
(4)、將「rescue.conf.gz」及「juniper.conf.gz」檔案傳送到ftp
指令語法:
put rescue.conf.gz
put juniper.conf.gz
(5)、中斷ftp連線
指令語法:
bye
完整過程如下圖所示:
[還原設定檔]
切換到設定模式,進行設定檔還原
指令語法:
root@testfw> configure
Entering configuration mode

[edit]
root@testfw# rollback rescue
load complete

[edit]
root@testfw# commit
commit complete

[刪除備份檔案]
在「CLI operational mode」模式下進行備份檔刪除
指令語法:
root@testfw> request system configuration rescue delete